
How to Restore and Create Nandroid Backup on TWRP Supported Devices. In this tutorial, we’ll show you how to make and restore a Nandroid backup on a TWRP-enabled computer. The Android environment has a plethora of choices. The possibilities are infinite thanks to its open-source existence. Every manufacturer ships the computer with a locked bootloader by default to prevent users from tinkering with the device’s operating system.
Many computer enthusiasts, on the other hand, take things a step further and venture into uncharted territories. All that is needed is a bootloader that has been unlocked. Following that, you can install a variety of custom ROMs, flash a custom recovery like TWRP, root your system with Magisk, or experiment with a variety of modules and frameworks.
Table of Contents
Restore and Create Nandroid Backup on TWRP Supported Devices
However, each side has two coins. The above-mentioned tweaks are in the same boat. Directly altering the device’s machine partition and the root directory is often dangerous. Even a minor mistake can result in a boot loop or, worse, a bricked system. In a normal situation, you may simply use your device’s built-in backup and restore function. Any of these features, however, would be useless if your system does not even startup.
So, what else is there to do? There is, however, a relatively simple procedure for dealing with such situations. Right from the TWRP recovery, you could build an entire system backup, including files, boot, and even the EFS partition (which contains your IMEI). Let’s take a look at the relevant measures.
How to Make a Nandroid Backup and Restore It on Any TWRP-Enabled Device
TWRP’s backup is referred to as the Nandroid Backup. The best thing about this backup is that even if your computer does not boot to the operating system, you can still access the backup and restore features. There are a few requirements that must be met if you want to do the same.
TWRP’s backup is referred to as the Nandroid Backup. The best thing about this backup is that even if your computer does not boot to the operating system, you can still access the backup and restore features. There are a few requirements that must be met if you want to do the same.
How to Create a Nandroid Backup via TWRP Recovery?
1. To begin, boot your computer into TWRP Recovery mode. Use the hardware key combinations for your computer or the ADB commands mentioned below. To do so, go to the platform tool folder and open the command prompt window (part of Android SDK and Platform Tools). Connect your system to your computer through USB (with USB Debugging enabled) and run the command below:
2. Select the Backup option from the TWRP Recovery menu.
3. After that, choose which partitions you want to back up. It is strongly advised that you pick all of the available partitions. Despite the fact that the Data partition will be very large, it will contain all of the devices and preinstalled app data. As a result, it’s a good idea to choose that as well.
4. You may also transfer the backup to a different spot. Internal Storage is chosen by design. Select Micro SD Card or USB OTG from the Select Storage choice to modify it (if supported).
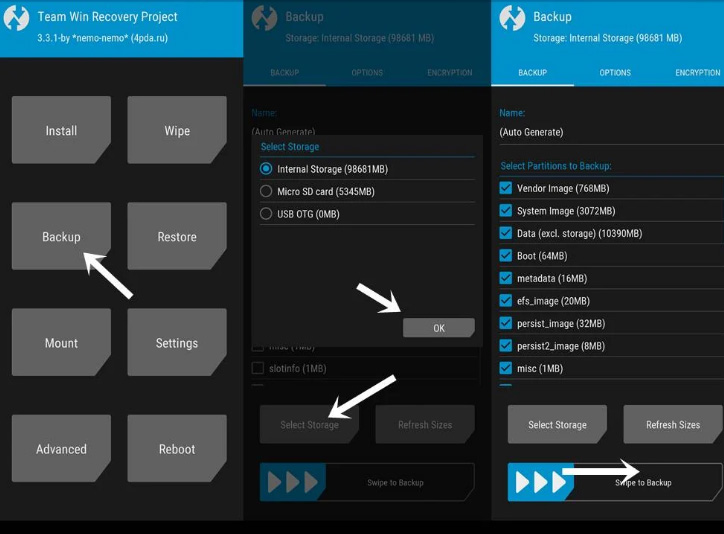
5. You may also change the name of the backup that is about to be produced if you like. Simply select the Auto-generate keyword from the drop-down menu below the Name field and type in the desired name.
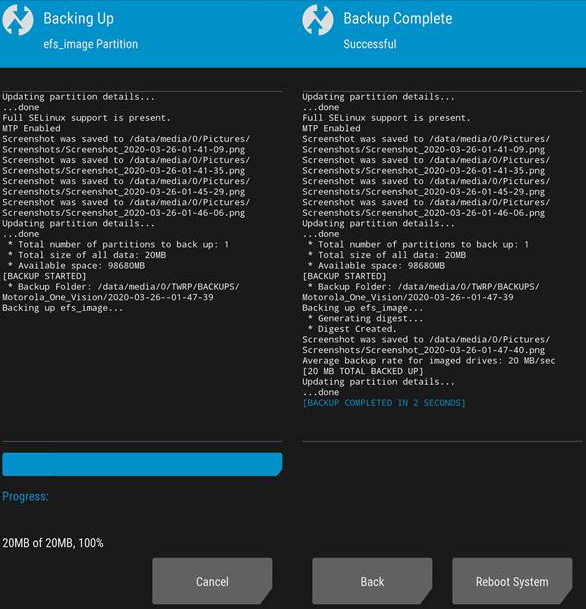
6. So, once you’ve picked all of the partitions, swipe right on the Swipe to Backup button at the bottom. You will now have to wait for quite some time, as the backup process will take some time depending on the size of the partitions (especially the Data partition takes a lot of time).
After that, you’ll see the message Backup completed in x seconds>. After that, you can return to System mode on your computer.
So that was all you needed to know about creating a Nandroid backup with TWRP Recovery. It is strongly advised that you save a copy of this backup to an SD card or a pen drive (if you have a USB OTG cable). This is because if your computer gets stuck in a boot loop or bricked, accessing the internal storage and therefore the backup can be difficult.
Restore Nandroid Backup via TWRP
Let’s look at how to restore this Nandroid backup using TWRP recovery now that the backup has been successfully made.

- To begin, use hardware key combinations to boot your computer into TWRP recovery mode. Alternatively, you might boot into fastboot mode, then use the Volume key to pick Fastboot and the Power key to confirm the selection.
- Select Restore from the TWRP Recovery menu. Choose your preferred backup under Select Package to Restore. Tap on Select Storage and choose the desired storage if the backup is stored on an SD card or USB.
- It will take some time to complete the Nandroid Restore via TWRP recovery. After that, you can return to System mode on your computer.